Wednesday, January 8, 2014

Someone started controlling my computer over the Internet -- what happened?

There are "Trojan horse" type programs, such as Back Orifice and Netbus, that could cause the behavior you are describing. Both BO and Netbus are Windows 95/98 applications designed to allow other people to access your machine (generally for malicious purposes) over the Internet.
In order for anyone to use BO on your machine, you have to install the server side of the application. This is normally done by getting you to download an application or by sending the server EXE to you in an e-mail message and hoping you execute it. This is why it is called a Trojan horse -- you have to consciously or unconsciously run the EXE to install the server -- it does not propagate itself like a virus (see How Computer Viruses Work for a description of Trojans and viruses). Once you execute the server EXE, the server is installed and will start running automatically every time you turn on your computer.
With the server installed, an evil-doer can run the BO client program and control your computer remotely, running programs, erasing files... Obviously, this is not a good thing. It is easy to detect Back Orifice either manually or with software.
These links will help you learn more:
How Computer Viruses Work
How Web Servers Work
Symantec: Information on Back Orifice and NetBus
Trojan horses: Back Orifice & Netbus
CNET News.com: Windows "back door" raises flags

Wednesday, January 1, 2014

Computer (PC) Tricks You Should Try Right Now


Computers have simplified our life to a great extent. Things that were impossible earlier can now be completed instantly thanks to computers. But, does this mean that a PC is all work and no play?

Obviously not! Here are some of the best tricks you can try out on your Windows based computer.
Computer Tricks
1) Make your computer speak what you type
You can use your PC's built in features and some VBScript magic to create a simple program that will make your computer speak whatever you input to it. What are you waiting for? Head over to this post to start a conversation.

2) Find your computer's gender
Want to know if your PC is a male or a female? Simple. Try the previous trick to know if your computer is a 'he' or a 'she'.

On a serious note, this depends upon the voice you have selected in Microsoft Text to Speech options.

3) Lock Folders with password
Do you often have other people seeing your personal files? You can store them in a password protected folder so that only you can access them. Go see this post to know how to protect your personal files effectively.

4) Make your computer greet you every time you start Windows
A simple modification in the first trick will let you have an awesome computer said welcome that you can use to impress all your friends. Just read this post to make your computer welcome you in its own mechanical voice.

5) Have fun with Notepad
PC Tricks
If you think that Notepad is just a basic text editor, then, you will be amazed by its capabilities. You can use Notepad to create everything from personalized logs to harmless viruses that are incredibly annoying. Go see this post to know just how useful Notepad is.

6) Command Prompt too has some tricks up its sleeves
So, you thought that Notepad has some tricks but not the command prompt? If you thought so, then you would be surprised to see all the cool stuff you can do with the Windows Command Prompt. Just see this post to get impressed.

7) Change your Processor's name
Are you bored of your old processor and want a new one with a staggering name? Change its name to something extraordinary to get that something special for your PC.

8) Make a Keyboard Disco
Use some VBScript coding to create a live disco using the LED keys on your keyboard. See this post to know how your keyboard can turn into a disco.

9) Use your Keyboard as Mouse.
You know you can use your mouse as keyboard using the On-screen keyboard. What if I tell you that it is also possible to do the reverse? Just read this post to see how.


These tricks work on Windows 8, Windows 7, Windows Vista and Windows XP

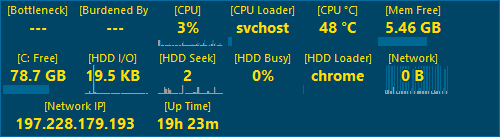
[Windows] Keep an eye on computer resources use with portable Moo0


used to scratch my head, pondering on why acquiring a Windows license key was so expensive. It has to be one of the most pocket-emptying pieces of software, along with Microsoft Office. There was a time when I thought that you had to be running a small business or you had to be a millionaire to be an owner of legit Microsoft license keys. When you delve into Windows and all the features it offers from the sophisticated folder explorer to the free updates and patches, you begin to understand. Writing an operating system using C as your basis, is not an easy task and it took a group of very talented developers to craft it into what it is. All the issues and gripes we have with Windows 8 can be forgiven, once we take all of this into account and that’s why I own three or more separate license keys, all paid for with my hard earned money.
With all the tools that Windows provides us with, sometimes they may not be enough. Time and time again, I find myself praising Windows 8’s new task manager for its extensiveness and its new found user friendliness. I still feel that it’s not enough to monitor my system efficiently. Can Moo0 System Monitor fill that gap in? Read on and find out?
WHAT IS IT AND WHAT DOES IT DO
Main Functionality
Moo0 System Monitor is an expansive PC monitoring tool that comes with a long list of stats and a widely customizable user interface that offers the user an array of display options to suit his or her needs.
Pros
  • Comes with a long list of stats and displayable fields that can be sorted according to the user’s tastes.
  • Has a widely customizable user interface
  • Supports a wide variety of languages
  • Controllable refresh rate and frequency
  • System tray minimizable
  • Lightweight
Cons
  • Its functions are not intuitively accessible at first
  • It’s not traditionally designed and this can be somewhat confusing until you get used to it
  • It does not come with extensive help resources which does not help quail the confusion
  • No feature that allows logging or archiving of stats and details.
Discussion
Moo01I hate making assumptions because I find myself second guessing and tip toeing. With that being said, when I opened Moo0’s system monitor up for the first time after it’s install, I found myself making quite a few assumptions. I assumed that it was one of those self-unaware applications that was designed to suit a primary need and nothing else, like a wooden hilted hammer. After all, it doesn’t even come with a close button. It’s as ugly as sin too and it displays only a few fields with the bare minimum amount of information attached to each statistic. I was already bored with it and at first, I decided that I wasn’t going to review it. After making these assumptions, I found myself a little red faced when I discovered the right click context menu on both the system tray icon and the user interface.
I cannot be entirely blamed for my indiscretions and misjudgements here because the program does not initially fully avail itself. Once I discovered the right click menu, it was like I was opened up to a whole new world. The application will come with a default set of fields that also depend on what your PC is packing. From the right click menu, you can choose to add more to the user interface. I’m too lazy to count here but there are a lot of displayable fields and they are directly proportional in number to the robustness of your computer’s hardware. Whether you choose to display none or create mass chaos by displaying everything, it’s really up to you. You can even sort and customize this list. I will say that if you choose to display every stat, the application will not perform so well; it will run slow and the user interface will start to lose its visual integrity. If you’ve changed the size of the window and add a new field, the window will revert to its default size. I found this a little annoying.
moo02The window can be stretched and shrunk but the number of fields being displayed also creates a limit on this extensibility. Another annoyance that I found was that it launches the entire window at start up like a surprise party and I kept forgetting that it doesn’t have a close button. You can choose to launch the application on start-up but unfortunately, you cannot choose to change the windows behaviour (on start-up).
Other customizable inflections to the aesthetics of the application include the ability to change how the auto hide feature behaves. You can also make changes to the general layout so the application doesn’t always have to look similar to a dinner receipt. Did I mention the large variety of skins and languages to choose from? Nelson Mandela (RIP) dubbed South Africa as a rainbow nation with all it’s diversity in language and culture. You can almost say that this software is comparable to that sentiment, in it’s diverse range of customizable aesthetics and language options.
CONCLUSION AND DOWNLOAD LINK
I feel ambivalent about this. I enjoyed playing around with the user interface more than I payed attention to the stats and details that it was made to display. Which means that there’s a great novelty behind it. I tend to get bored with novelty applications after a while. As for you, a normal person who isn’t as weird as me? Moo0 System Monitor is a good tool. You can find a long list of alternative system monitoring programs but if you’ve never tried one out, I believe that Moo0 System Monitor deserves a home on your desktop.  If you can, make a donation to the developer as well because s/he offers a great amount of useful freeware software.
As for Ashraf’s personal choice, I believe he prefers Rainmeter over everything else. There is also BgInfo. Pick whichever one you want.
Price: Free
Version reviewed:1.76
Supported OS: Windows XP/Vista/7/8
Download size: 3.86
VirusTotal malware scan results:  0/49
Is it portable? yes

Thursday, December 19, 2013

Android Tips and Tricks

1. Using a Task Manager.

Many Android devices come with their own task manager to manage running programs in the background. Stopping unused running apps will help increase speeds and battery performance. If you don’t have a task manager on your device you download one from the Google Play store, such as Advanced Task Killer (Steps below).

1. Go to the Google Play Store.

2. Search for Advanced Task Killer.

3. Download and Install the Free version of the app.

4. Once installed, open the app and click "KILL selected apps".

5. The app will clear any open programs that may be using computing power.

2. Battery Usage.

Many of us go through a whole battery charge in just a single day. To see statistics for battery use, such as which app is using the most power, screen on time, Wi-Fi connectivity and Cellular connectivity, follow the steps below.

1. Go to Settings.

2. Scroll down to About Phone.

3. Tap Battery or Battery Usage.

4. You should now see a large graph on top (Click on it to expand it) and a list of apps.

3. Data Usage.

With many cell phone carriers charging high prices for data usage, Google has added a Data Limiter to stop your Android device from going over your data plan. You can set a maximum which will stop all data usage and set a warning to allow the device to warn you when you arw about to reach your maximum.

1. Go to Settings.

2. Then Tap Data Usage.

3. You’ll see a chat displaying your 3G or 4G data over a period of time.

4. Make sure the Mobile Data switch is set to ON.

5. Move the Red bar to select your data cut off point and the yellow bar to have the device display a warning.

4. Save Webpages for Offline Reading.

If you are using a Wi-Fi Android device, but want to continue to read your webpage as you travel, you can read the page offline. Offline reading will save the webpage to your phone’s storage device.

1. Go to the webpage you wish to save for offline reading.

2. Tap your device settings button (Normally next to your home button).

3. In the menu select Save for Offline Reading.

4. Allow your device to download the page.

5. Once you’re ready to finish your reading you can view it again just like a normal bookmark.

5. Taking a Screenshot.

In Android Froyo, Gingerbread or Honeycomb you never had the option to take a screenshot. However, in the latest Android versions ICE and Jelly Bean you’re now able to take screenshots of your device.

1. Go to the page you wish to screenshot.

2. Press and hold the power button + volume down buttons simultaneously.

3. The screen will show a quick flash and save the photo in your gallery.

6. Sync Facebook Profile Pictures to Contacts.

If you ever wanted to display a profile picture for your contacts, you can sync your contacts with Facebook to display their profile picture in your contacts list. Syncing Facebook’s profiles pictures will automatically look at your phones contacts and compare it to your friends list, after the sync has finished Facebook will add your contacts image to their contact. If you wish to stay connected, Facebook will keep your contact’s pictures up to date.

1. Download the Facebook app via the Google Play Store.

2. Open your Facebook App.

3. Tap your settings button (Normally next to your home button).

4. Scroll to Other settings and Sync Contact.

5. Here you can Sync all data, Sync with existing contacts, and remove Facebook data.

7. Hide Pre-installed Apps.

Many Android devices come with pre-installed apps or bloat ware. Many of us never end up using the apps, so why not hide them?

1. Go to your Applications list.

2. Tap your settings button (Normally next to your home button).

3. Select the Hide Apps button in the menu.

4. Select the Apps you wish to hide then click Hide.

Note, if you’re not sure whether an App is needed, research its name before making any changes.

8. Add Widgets to the Home screen.

One nice thing about Android is that you can have live widgets running on any home screen. They have settings to update themselves automatically so you’re always up-to-date.

1. Find an empty area on your home screen or where you wish to place the widget.

2. Tap and hold the empty space for a few seconds.

3. Now you should see "Add to Home screen" in the popup window.

4. Tab Widgets.

5. Select the Widget you wish to add and move it into the correct position on your device.

9. Locking your device.

Unlike other mobile OS versions, Android offers a variety of different ways to unlock your device. We have Pattern unlock, Number Pad unlock and face recognition unlock.

1. Go to Settings.

2. Go to Location & Security.

3. Tap on Set up screen lock.

4. You should now see three different choices displayed.

5. Select the type of unlock you wish to enable.

10. Lock the Screen Orientation.

Sometimes if you’re laying down, or just don’t want the device to switch the screen orientation, you can now lock it. Locking the screen will keep it in whichever position you want it.

1. Go to Settings.

2. Tap Display.

3. Look for the Auto-Rotate Screen and uncheck that box.

11. Android Easter Eggs.

This is just a fun Easter egg found on all Android devices. Doing the following will show a neat picture that Google have included in the OS.

1. Go to Settings.

2. Then go to About Phone.

3. Find where your Android version is listed.

4. Quickly start tapping on the Android version for a few seconds.

5. If done correctly a small picture should appear.

XCOM: Enemy Unknown Simple Tweak Guide

In this short guide I’m going to be going through some quick tweaking tips for you to play around with. This is mostly easy stuff with little to no way of making a terrible mess of your game.

Most of the basic tweaking is done from editing BaseEngine.ini. Make sure that you create a backup of this file before continuing! Use ctrl+f to ‘find’ the option header.

The first and most useful is the resolution and refresh rate tweak:


In this image, I’ve demonstrated one viable option, you can use virtually any combination you want!

So what do these options mean?

First, ‘AudioDevicesClass’ is simply the default audio device the game is using.

Second is the minimum horizontal resolution; the third being the minimum vertical resolution. You don’t need to have an orthodox setting either.

Fourth and fifth settings are similar to the last two, except that these allow you to get higher resolutions for those GPUs with more memory.

Sixth and seventh are the refresh rates. If you don’t know what this is, you probably should not mess with it. Otherwise it should be best to leave it alone, you can try 120hz to see if the game will function with a 3D monitor, but I haven’t tried it.

Eighth simply allows you to use a gamepad.

========================================================

This next picture is pretty basic, as there are few useful options but I wanted to point it out anyway:


Remember these are the options on my system, yours may differ.

This one is pretty simple to understand – if your game is not bright enough, or you want it brighter, you can use this option to change the gamma. Note that the game will look tarnished at settings above 3 and look washed out at settings below 0.

With MinDesiredFrameRate the game engine will attempt to render at no less than the specified framerate. It’s kind of like an FPS lock.

The other two options are not important.

========================================================

This next picture provides you with an area where you may edit some memory (RAM) settings:


If you have 4 GB of system memory, this is what your settings should be

Memory Pool: The size of the texture pool, in MB. Basically, the more RAM and video memory you have the larger the pool you can use.

MemoryMargin: Amount of memory to keep free, to be used as temp memory when streaming in new data, in MB. Really not necessary to change.

MemoryLoss: Amount of memory to keep unavailable, a feature not yet functional in Unreal Engine 3.

========================================================

In my final picture you’ll have a look at some multiplayer options. This is the easiest to find but I thought I’d explain it anyway since it also includes server hosting info:


This is the default setting, you can change it here to make things convenient.

Protocol: Ignore this, should not be changed.

Name: Simple enough, the name of your online alias.

Map:Seems to have no effect when changed.

LocalMap: The map of the server

TransitionMap: Untested, likely the map that comes after the first.

MapExt: Specify whether or not the map is a UT3 map or XCOM.

Port: What listen port (UDP/TCP) to be used by the server.

PeerPort: What port (UDP/TCP) users should use to connect to your server.

GameName: How your server appears in a server browser

GameNameShort: Similar to above.

That’s all for this guide, it’s nothing comprehensive as my purpose was to get you interested in modifying the game as well as giving you the options you’re most likely going to want to fiddle around with. More advanced users are encouraged to look around and have fun with all the great options they have available to them.

All you need to know about RAM

Random-access memory (RAM) is where the PC stores a relatively small amount of ephemeral data that is more rapidly accessed by the Central Processor Unit (CPU) rather than data stored on a long-lasting memory device, such as hard drive or CD. Unlike data that are stored on long-lasting memory devices, information within RAM is lost when there is no power.

While either buying or upgrading RAM it can become tricky, as purchasing the incorrect type of RAM and attempting to install it within your PC could cause your PC not to boot at all. Throughout this article is a complete guide on all you need to know when changing RAM.

Identify what RAM your motherboard accepts

Knowing what type of RAM you need depends on the make or model of your motherboard. The quickest and easiest way to find out the correct RAM is to check your motherboard’s manual or manufacturer’s website. It is crucial that you check the compatibility list as installing the wrong type of RAM will cause the PC not to boot.

If you’re running an older machine looking to increase its RAM understand that older PCs like Dell used to use their own proprietary architecture making third party RAM incompatible. Newer Dells and PCs however use generic RAM now.

When looking to purchase RAM, you may come across the option to select buffered, also called registered, or unbuffered. The major difference between the two is that buffered memory is designed for server motherboards whereas unbuffered memory is designed to run with standard desktop motherboards. One final note about unbuffered memory is it can also be symbolized with a U – for example PC3200U.

If you are interested in knowing the exact type of memory currently installed in your system, Speccy is an excellent tool to use. It will provide you with the exact type, model number, speeds as well as brand name not only for your RAM but for every other PC component.

Mixing RAM

Be careful with mixing memory sticks as in some cases it may cause the PC to not boot. Mixing faster memory with slower memory will always result in the motherboard using the slower speeds. Same issue goes for the sizes. Having one 4GB with one 2GB is not ideal as one stick may receive double the work. However as long as both memory sticks are on the compatible list provided from your motherboard the PC should accept the new RAM.

Memory works best when running in the correct channels along with a matching RAM stick. Channels are the dual in-line memory module (DIMM) slots located to the right of the CPU socket. Here is where RAM is inserted into the motherboard and is where the RAM will receive its power as well as do its calculations. There are four different types of channels that different motherboards use: Single, Dual, Triple, and Quad. The most common found on motherboards would be a dual channel meaning that the PC will perform its best when running two RAM sticks at a time.

Overclocking RAM

The standard RAM speed for an Intel CPU is 1600MHz, anything higher will run off the motherboard’s chipset adding more load to the motherboard. The AMD FX series on the other hand works best with memory running at 1866MHz.

It may sound good to overclock your RAM, as you’re forcing the RAM to work overtime just like an overclocked CPU. However RAM overclocking is much different as it deals with adjusting voltages, latencies and other settings within your BIOS.

Unless you are a PC enthusiast I would recommend keeping the RAM settings within the BIOS to default and to not purchase anything higher then 1600MHz RAM for an Intel or AMD system, with the exception of the AMD FX series of course.

How to Perform a Remote Wipe on a Mobile Phone from Exchange Server 2010

There’s a neat tool in Exchange Server 2010 that you may utilize in case a company smart phone (e.g. Android, iPhone, Windows Phone, etc..) has been misplaced, lost or stolen, to protect all the sensitive data stored on that phone. You may perform a remote wipe of the data on the mobile phone from Exchange Server without having to do a physical mobile data wipe out.

On the Exchange Management Console, expand Microsoft Exchange On Premises, expand Recipient Configuration, click on Mailbox, from the Actions pane, select the Mobile User that you wish to do a remote data wipe out, click on Manage Mobile Phone…


On the Manage Mobile Phone properties select Perform a remote wipe to clear mobile phone data in the Action section then click on Clear.


This process took less than 2 minutes to complete a remote wipe of a business mobile phone.